
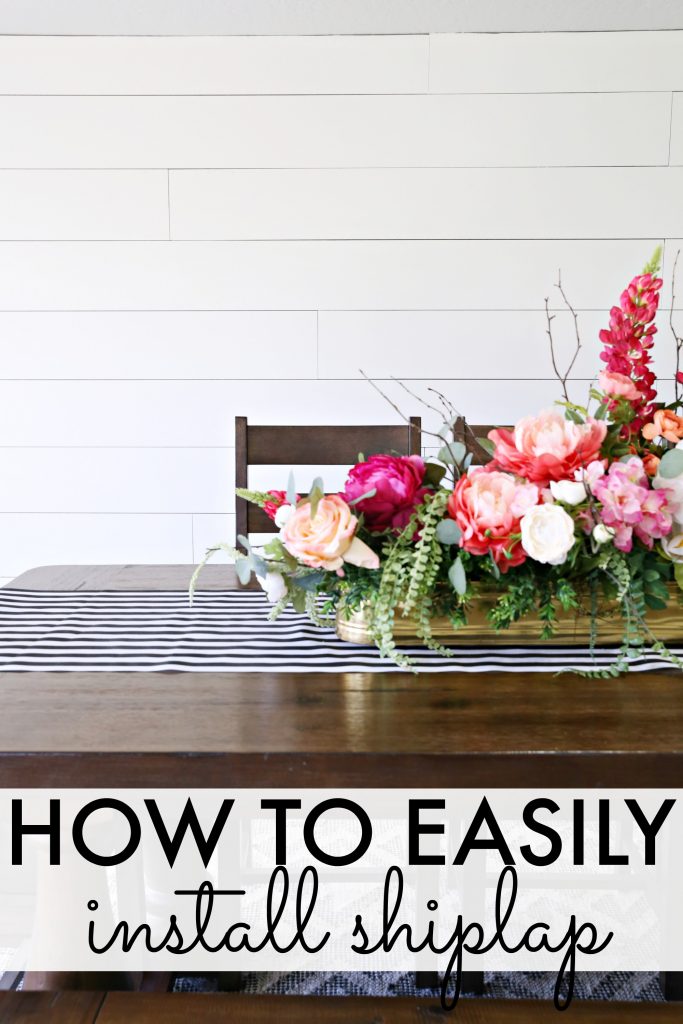
DIY Shiplap Wall Tutorial
Shiplap walls are a hot trend right now! We’re going to show you how to make your own DIY shiplap wall in your own home!
How to make a shiplap wall
To shiplap a wall, you need a few basic tools and basic woodworking knowledge. This is a very beginner “woodworking” project but you need to be comfortable using a saw to make your cuts. We have done several shiplap walls and have fine tuned our method for building a shiplap wall.

To shiplap a wall, you need a few basic tools and basic woodworking knowledge. This is a very beginner “woodworking” project but you need to be comfortable using a saw to make your cuts. We have done several shiplap walls and have fine tuned our method for building a shiplap wall.
Supplies to make a DIY shiplap wall
- 1/2″ MDF – We have Home Depot cut down a 4×8′ sheet of MDF into 8″ strips.
TIP: If you order and pay for the sheet of MDF online, some Home Depot stores will cut your strips for you before you go and pick it up. This makes your project SO much easier!
- Miter Saw or Circular Saw
- Jigsaw (optional) *for cutting around outlets or light switches
- Nailer (this one is our favorite and we HIGHLY recommend it!) You can use a hammer and nails if you don’t have or don’t want to buy a nailer. It is a bit more tedious and time consuming without one.)
- 1.5″ brad nails (if using nailer)
- Tape Measure
- Popsicle sticks
- Level
- Paintable caulk or wood filler (this is important!)
- Primer (optional)
- Paint (see some of our favorite colors here!)

DIY Shiplap Wall Tutorial – Step by Step
Time needed: 3 hours and 30 minutes.
How to DIY Shiplap Wall:
- Get your MDF ready
Cut your MDF into 8″ strips – you can do other widths but we love the look of the 8″. Most home improvement stores will cut the strips for you. Some charge a small fee but in full disclosure, we’ve never been charged the fee. Be nice to your lumber department employees and they’ll take care of you!
- Prep your space
Remove any outlet covers with a small flat head screwdriver (or a butter knife! haha!)
- Nail MDF info the wall
Starting at the bottom on one corner, start nailing your first row of shiplap to the wall. Make sure your first row is completely level before nailing. NOT all floors and baseboards are level. There’s a good chance it may not be so double check. If there are any slight gaps, you can fill with caulking later. Again, make sure your first row on your shiplap wall is level. We always nail into the studs first (you can use a stud finder for this step if you don’t know where your studs are) then we always use extra nails into the drywall/sheetrock for extra support. Starting at the bottom allows your next rows to sit on the bottom for support while you nail them in.
- Cut your MDF to the length of the wall
When you get close to the adjacent wall, cut your MDF strip to length with a miter saw or a circular saw. Nail to the wall.
- Add spacers to the row
Next, use your popsicles sticks as spacers and nail on the next row.
- Repeat! You’ve got this!
Repeat all the way up the wall, using a jigsaw to cut around any outlets or light switches.
Shiplap Wall Video Tutorial
To see our shiplap wall projects, check out:


Half inch mdf is pretty heavy. Could you use 3/8” instead?
Yes, for sure!
How come you use MDF instead of 1/4″ plywood? Is there a distinct advantage? Also, popsicle sticks instead of nickels as spacers? Is that better? I’ve done a couple of shiplap walls but am curious about these differences.
Hey Holly! Both of those would work just fine. We wanted MDF because its super smooth compared to most plywood. The smoother plywood sheets seem to be more expensive and our client requested MDF. Nickels and Popsicle sticks are about the same but we never have enough nickels around. 🙂
What color paint did you use? Would you recommend this white paint for any project/walls in your home?
What length do you cut the MDF?
You cut the strips in 8 foot strips, correct?
Nicely done. Looks lovely.