
DIY Wood Scalloped Wall Tutorial
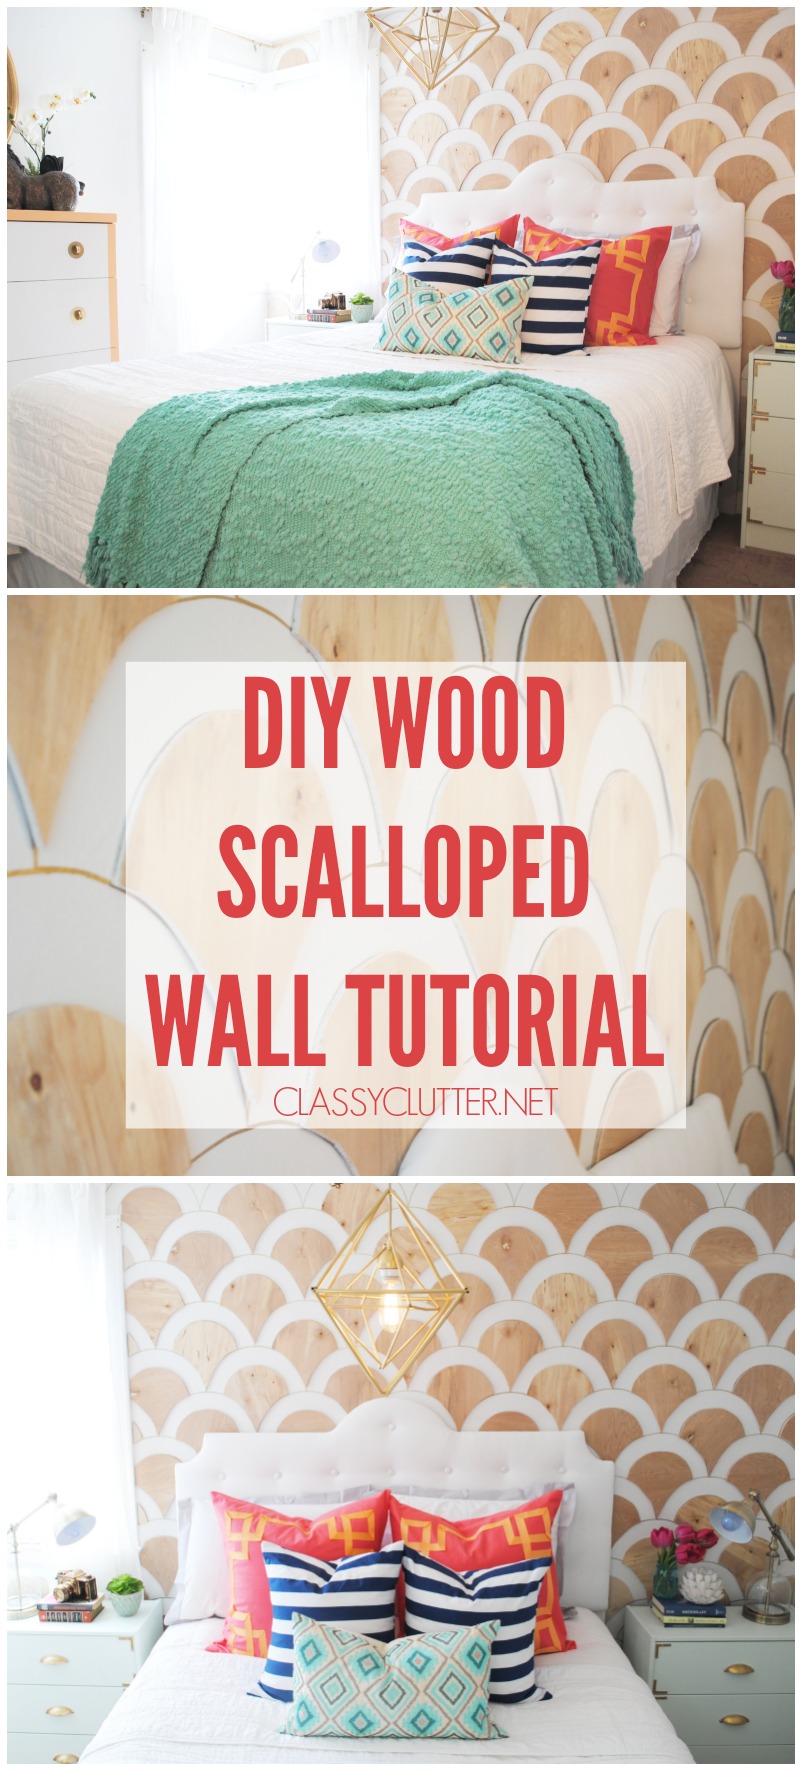 Today’s the day! I have had floods of comments and emails asking for this DIY Wood Scalloped Wall Tutorial and as promised, here it is!!! This wall treatment is honestly not that hard or terribly time consuming. Not to mention, it’s damage free to the wall! Hello, awesome! Savannah and I created this (and the entire bedroom makeover!) over a space of 4 days and the wall treatment was one of the lesser time consuming parts of the makeover. Honestly, this is one of my favorite projects, probably ever! Heck, I’ll say it… it’s my favorite project EVER! I mean, it’s pretty awesome, right? Materials
- Sharpie Paint Pen (I used gold and it’s amazing!)
- Scrap of cardboard or thick paper to make a stencil
- Pencil
- 1/4″ plywood panels (Home Depot has the perfect plywood for this)
- Jigsaw – I have this one Super inexpensive and did the job quite nicely.
- Scissors
- 3M Mounting Tape
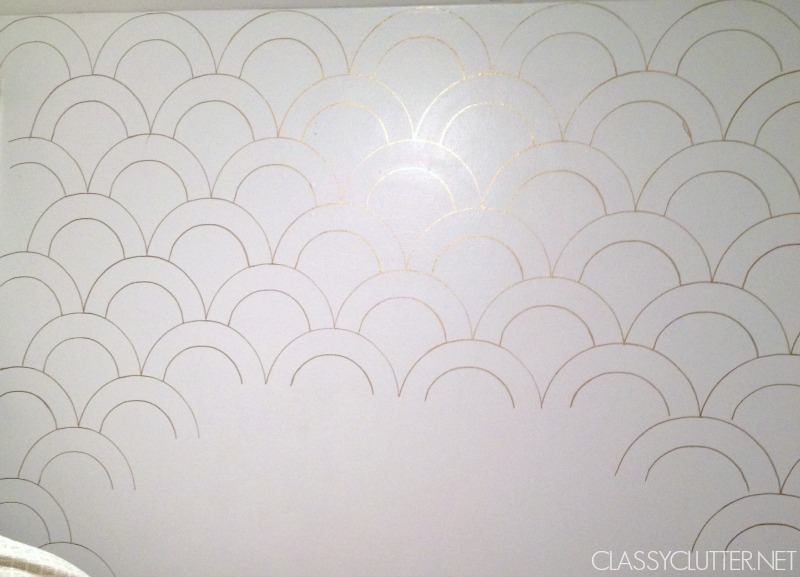
First, follow Savannah’s tutorial for the Gold Sharpie Scalloped Wall. I flipped my scallops the other direction then, I added one more row of scalloping within each scallop. 
 Yep, I cheated and didn’t do behind the headboard because let’s get real, ain’t nobody got time for that. No one is gonna see it so don’t waste your time! 😉
 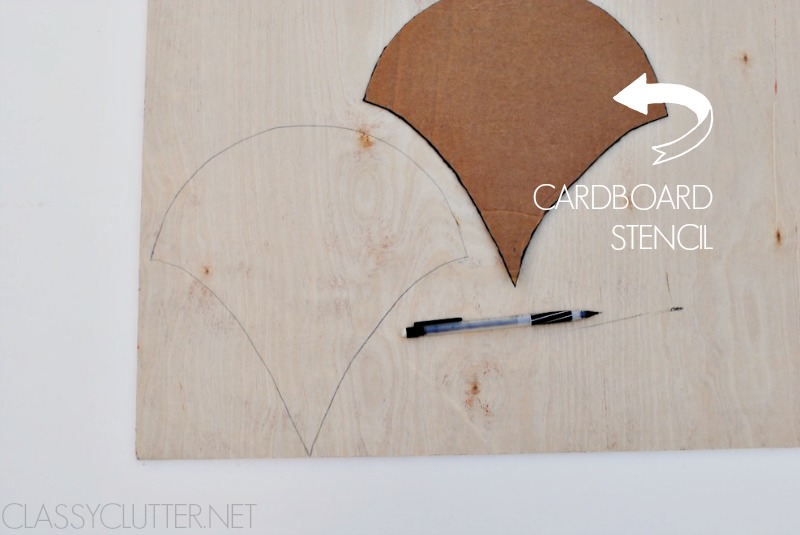 Next, using your smaller scalloped stencil, trace your shape onto the plywood sheets with a pencil. TIP: We used a clamp and did 4 sheets of plywood at once. That way we only had to trace the shapes on the top sheet of plywood and cut four out at once.
 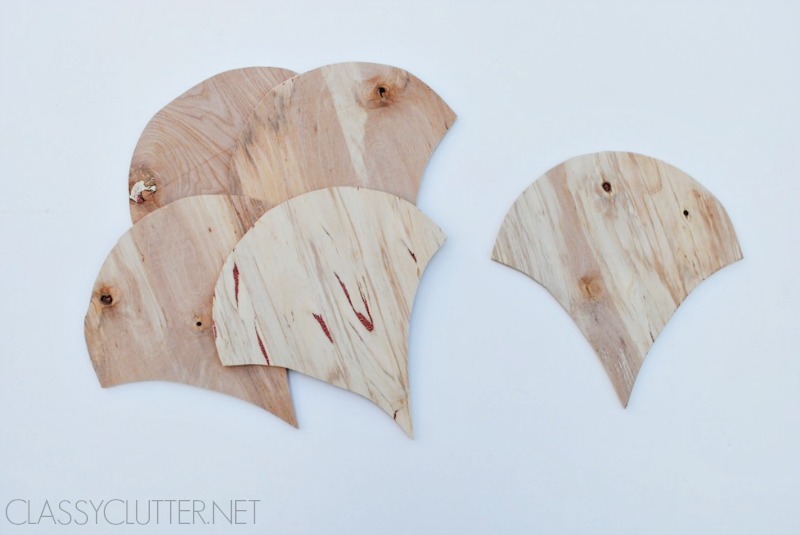 Once you have all your pieces cut, it’s time to hang them up!
 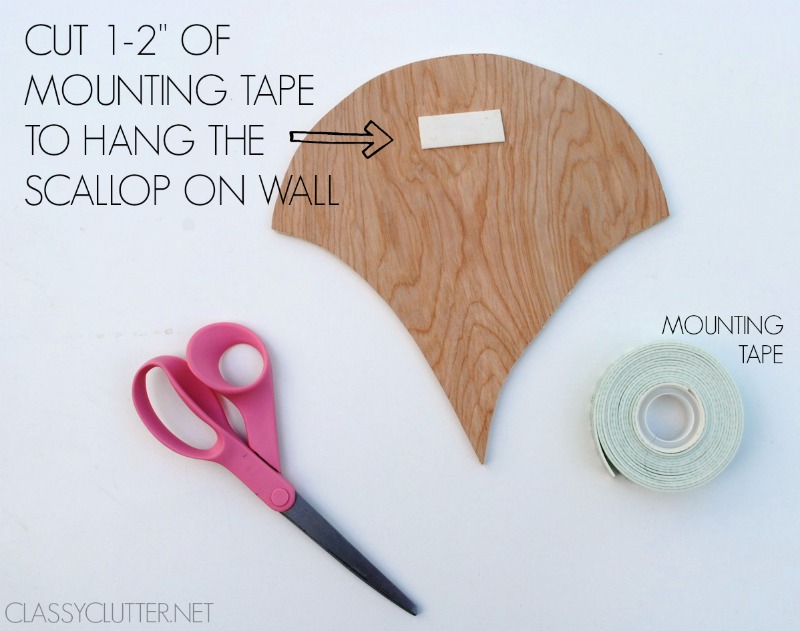 Use your mounting tape and stick a 1-2″ piece on the back and hang them up.
 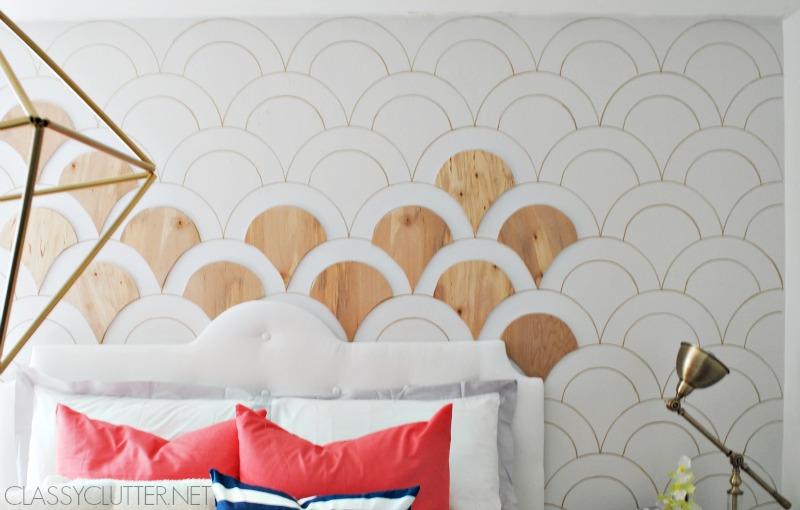 Here’s a shot of the process as we worked. Once you get all of your pieces cut out, it goes super fast! No nail holes to fill and no damage to your wall but you have an awesome wood wall treatment!
 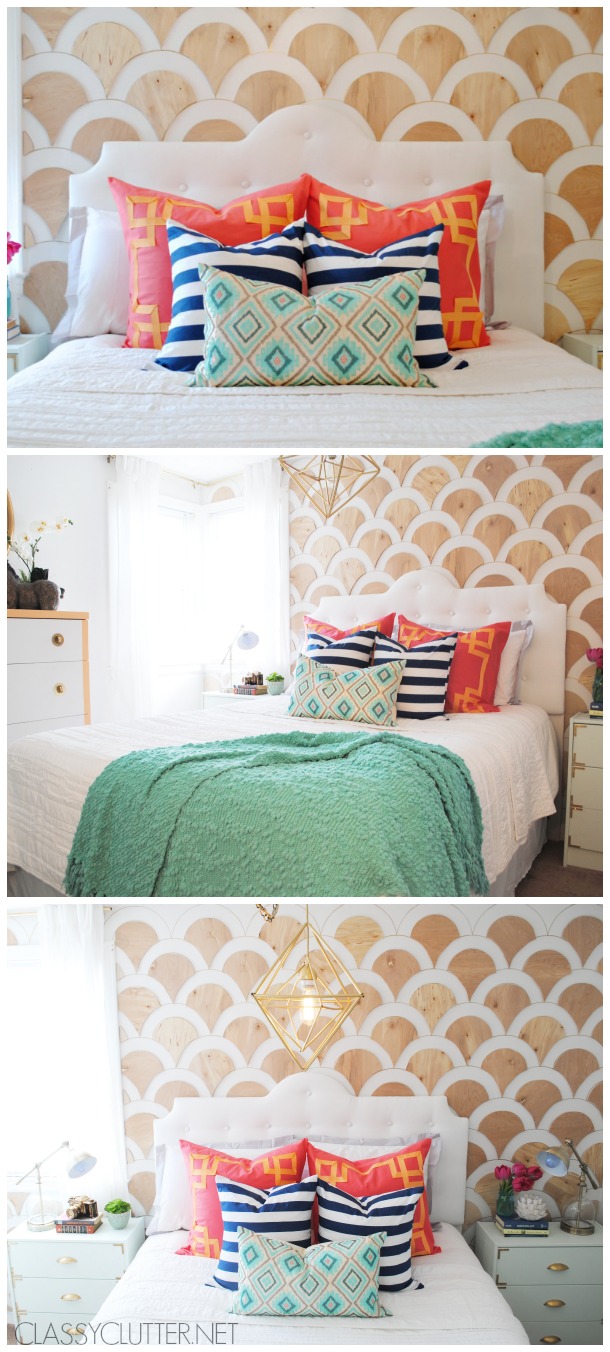 This awesome wall earned us 2nd place out of 299 projects in Creating with the Stars and I’m super excited to be the lucky one that got an awesome room makeover with the help of my bestie, Savannah and our sweet friend Mandi from Vintage Revivals. I mean, how many people get to say Mandi helped decorate their room? Booyah! Thanks to both of you girlies for helping me create my dream room! Love you both to pieces! If you love the scalloped look but don’t want to mess with the wood, Savannah’s Gold Sharpie Scalloped Wall is amazing!
  You can find the DIY Modern Tufted Headboard tutorial here.
 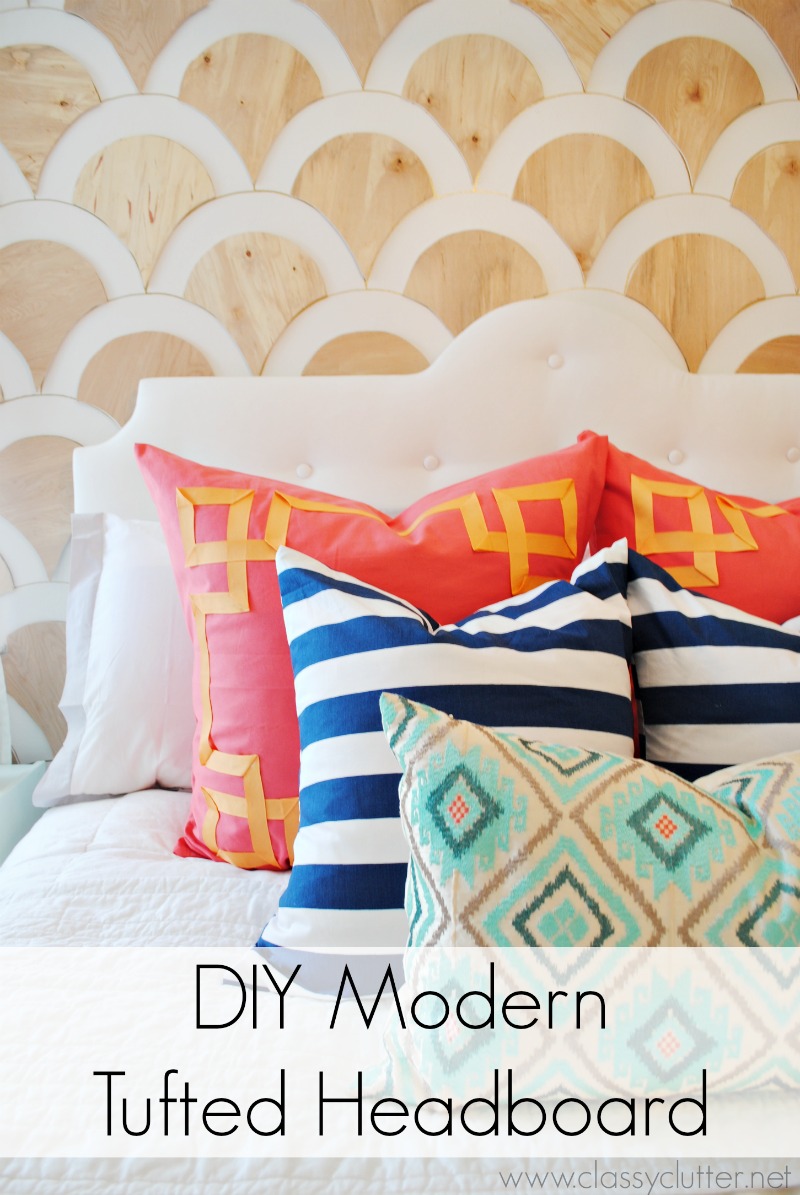 Also, don’t forget to check out my amazing Pixelated Wood Wall Treatment that got 1st place in the Paint Round of Creating with the Stars!
 ![]()


This is beautiful! I also can’t wait for the tutorial on the macrame chair. Your accent walls in general are the best ever.
Thanks for sharing!
Mariella
Along with the millions, this wall treatment blew my mind! Love how simple it looks (other than cutting all the shapes). Stunning!
Totally want to do this in my office!! Awesome job!
Consider using wood veneer which can either be special ordered or is available at some lumber shops instead of plywood. The veneers are available in a wide range of woods including several beautiful and exotic, and because they are so thin can be cut with scissors!
Great suggestion! We thought about that as well but really wanted it to be a bit thicker to give the wall a little texture but it’s an excellent idea! Thanks for sharing!!!
This turned out so cute!! I love that you added the wood.
so fabulous, girls! I need to try my hand at the sharpie wall!
Love this!!! What a great feature wall!
Love your room! Is the light something that Mandi from VR created? I love it and was hoping for a tutorial. Love your style!
Hi Hillary!
Thanks so much! No, actually I made it. I will be doing a tutorial pretty soon! Thanks for stopping by!
xoxo – Mallory
Wow, this is beautiful and I LOVE how you used the gold sharpie! I hope you will stop by and share this at The Makers link party going on at my blog right now, UpcycledTreasures.com 🙂 Pinned!
~Katie
I just love this – it’s so crazy creative and unique!
*mind blow* this is so good. Really unique take on the art-deco look. so much love.
Amazing! I’m not generally a huge fan of accent walls, but I’m seriously considering doing this one in my bedroom.
Your accent walls are beautiful. I love the idea of using mounting tape to temporarily adhere wood cut outs to give the wall texture and warmth. 🙂 I might use some of your great ideas on a smaller scale, just for fun. Thank you for sharing your creativity.
Hi! I love this wall and the headboard. I was wondering where the pillows and bedding are from.
Hi Elizabeth!
The quilt is from Target and I made the pillows. The front turquoise ikat pillow is from Marshalls. Thanks!!
That is just stunning! GREAT JOB!!!
How did you keep the cutouts level? I am working on this in my room right now and realized my ceiling is not entirely level, it slopes about two inches from left to right. Did you come across this problem?
Hi Megan, You will definitely want to measure to make sure you are doing each row of scallops level. I drew the gold scallop design first and that is when I did all my measuring to make sure everything was level. I’d recommend a laser level so you don’t have to make any marks on the wall.
Hope that helps!!!
Absolutely gorgeous!!!
But that headboard is beautiful
Where did you find it!:)
Hi Betsy! Thank you!! I made the headboard. You can read the tutorial here: https://www.classyclutter.net/2014/04/diy-modern-tufted-headboard.html
Thanks, Mallory
Wow! This is stunning! I need to find an empty wall to try this:)
Great Job! I’m not a very handy person so is there another way to cut out the wooden shapes? Or is it easier to just try and use the jigsaw? Thank you!
I am loving the idea! I am thinking of doing a headboard like this and using cork instead of wood. No jigsaw needed:)
Very Cool! So many possibilities to expand on this great tutorial. Thanks Ladies!
Do you have a stencil for this?
im in love with this diy! but those teal night tables are just AMAZING! please tell me where they are from?
Hi Joli! They are from Ikea but I gave them a makeover. You can check out the post here: https://www.classyclutter.net/2014/06/diy-campaign-style-nightstands-ikea-r.html
One of the best project when it comes to decorating the walls I’ve ever seen !!
I could only find one template to down load at good housekeeping.com/scallopstencil. Would u post a stencil link with both scallop templates. All of my small scallops are cut and ready to go. I just need the larger scallop template. Looking forward to the finished product.
Hi Wendy!
We only used one template. The larger one is just about 2 inches larger across the top but the same shape, you could cut another template if you don’t want to “eyeball” it. 🙂
how is the sharpie paint pen not damaging the wall? is the only way to get rid of it to paint over it? (I’m renting and can’t paint my bedroom wall)
Hi Devin! The sharpie would definitely need to be painted over. The sharpie is optional. If you aren’t allowed to paint, I’d suggest using a pencil and lightly marking your scallops or you can omit this step entirely and just put the wood scallops up. You do not need the Sharpie markings for the overall effect. 🙂
wow thank you for your quick response! I just discovered your blog and am in love! I already have two other projects that I will be doing soon!
What are the dimensions of the stencil you used?
Looks great. I like this wooden DIY project very much. Your bedroom look so cute. It is really great idea to make our home furnished with woods. I’m doing some research on DIY projects. I want to do something like that for my family. But I have no idea now. Thanks for sharing your idea.
This tutorial is exactly what I am looking for a long time. Look great! I love that you added the wood, too.
This is a a great tutorial !
How long does it take to finish it ?
This is fantastic! Thanks for sharing a very detailed tutorial how we can do it ourselves! I hope to do the same with our bedroom as similar looking design, too.
This is a great idea for bedroom. I like DIY wood projects like this. Thank for share !
This is so chic! Love.