
Anthropologie Inspired Knotted Comforter Tutorial


I’ve been obsessed with this comforter for like… a while. A long while. Remember when I posted about it here and here?

I’ve seen this same(ish) quilt or duvet cover around and Anthro’s was my favorite.
I really liked Anthro’s the best because I really loved the knotted look! Granted the pleats would’ve probably been easier to DIY but I love the look of the knots!
Alright, here’s the deal, I took about a bajillion (It’s a word!) pictures of this quilt as I worked on it but I think that a video will really show you how to do it WAY better than a hundred step-by-step pictures. This is going to be a SUPER long post so bear with me!
Heeeeeeeeere we go!
For a Queen size comforter you’ll need:
– 2 queen size jersey sheet sets. I got mine from Wal-Mart and I used two flat sheets and one of the fitted sheets. Which was nice because now I have one fitted sheet to use on my bed with the quilt. The brand was the “Mainstay’s Jersey Sheet Set” it came with a flat sheet, a fitted sheet and two pillow cases. I think they are $23-something for the queen set.
– A thin queen-size duvet – I got mine from Marshall’s for $24.99
– Sewing Machine threaded with coordinating thread
– Scissors – duh!
– Embroidery thread – also from Wal-Mart for like a buck!
– 1 long quilter’s needle (I think that’s what it’s called) A long needle isn’t absolutely necessary but this is just what I used.
I’ve had a couple people asking how much they’d need for a King size bed. The only difference would be a thin King size duvet instead of the queen and one more jersey sheet (or enough jersey fabric) for 49 squares (7×7 square quilt).
Here’s how it goes down!
Step 1: Cut out 36 squares! I did 18×18″ squares. They don’t have to be absolutely perfect but try to make them as square as possible. I made a cardboard template so I didn’t have to measure and mark every time. It really helped a lot!

Step 2: Making the knots! This is kind of tricky (tricky to explain, not tricky to do!) so I included a video of how to do it. This is my first time making a video for the blog so please excuse my inexperience! I say “um” a lot and stutter a lot. Just to warn you but I think it really does help you to understand how to make the knot part. It is kind of long because I explained in detail what to do 🙂
Steps for the knot:
–Trace a circle in the center (about 4-6″ circle) using a pencil, not a hot pink sharpie! I only did that for video purposes! 🙂
-Using embroidery floss/thread, stitch under and over the entire traced circle.
–Pull your thread tight to make the “ghost” with the poof – this is the major part of the “knot”
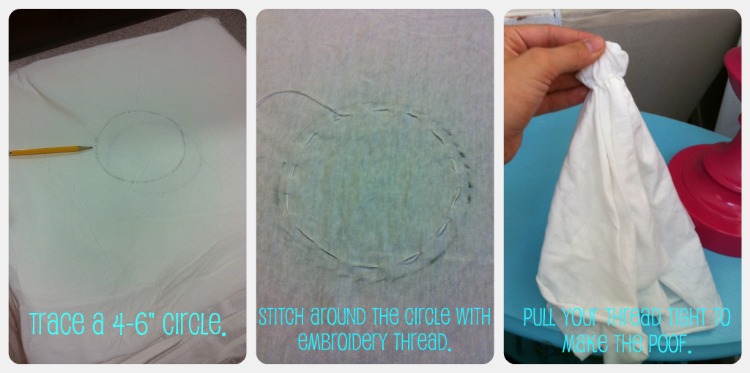
-Finally, run a stitch or two through the center of your “poof” to create the “knot” look – seriously, the video makes it much easier to see what I’m talking about. It’s really not hard at all.

-Now you’ve got your squares all done with all the knots in place. The next step is to sew all your squares together! I sewed 6 squares in a row then sewed my 6 rows together to make a 6×6 square quilt. I didn’t take a picture of this step but it’s pretty simple!

-Next, you take your duvet and pin the quilt squares to the duvet. You will pin it with RIGHT sides together! If your duvet has squares it is super easy to do this because it kind of gives you a grid as a guideline so you can make sure that everything stays pretty even. You will want to pin little pleats or gathers as you pin so it gives it that ruched look.

-Once you’re done pinning, sew along the perimeter of your duvet leaving about an 8-12″ opening at one side so you can flip it right side out after it is all secured.
-BEFORE you flip it right-side-out, go over your quilt 2-3 times to make sure you removed ALL of the pins. They hide SO well in their and seriously, I went over a couple times and kept finding more! You want to be really really thorough! Because, OUCH, that would hurt if you found one when you go to bed!
-With all the pins removed, flip your quilt right-side-out and sew your opening shut. You may even want to go over it one more time to make SURE you got all the pins out!
Almost there…
Now the final step is to run a stitch over the seams in between the squares. Through kojo design’s tutorial, she found this tutorial on YouTube to help you to do this really simply!
Then, YOU’RE DONE!!! Time to do the happy dance and make your bed with your new quilt!!!
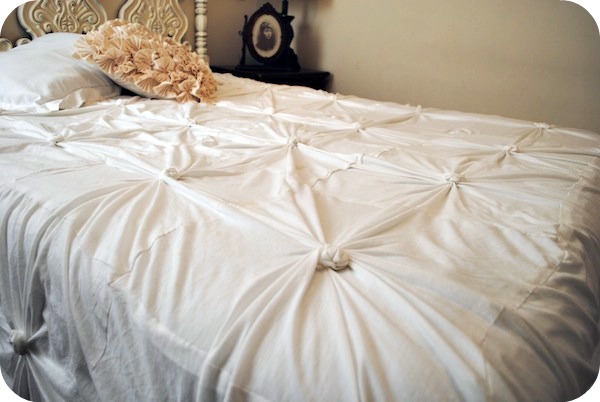


Sooo… What do you think?! I swear this was NOT hard at all just very time consuming! I LOVE LOVE LOVE my comforter! Although, I will need to find a really WARM blanket for the coming months in Buffalo!
***This tutorial was adapted from Kojo Designs – she has a very similar, fabulous tutorial on this quilt as well. Between the two, you should be a pro at making this bedding! I couldn’t have done my own without her tutorial’s help! So special thanks to KoJo Designs.
So the question is…. DO YOU LIKE IT???

I entered this project into the CSI Project “Knock Off” Challenge


Pretty!
Cute! Love the ruffly pillow too! 🙂
Absolutely beautiful and excellent tutorial! So glad your link-up was before mine over at 504 Main! Jenn
Love! So pretty.
L.O.V.E. it! You did a great job! Such a comfy and classy lookin’ bed set-up
Visiting from Tatertot and Jello tonight,
~Suzanne in NW Illinois
Wow, what an impact that makes on the bed. Beautiful job on the quilt and you did a wonderful job with your video tute. Stopping by from Funky Junk tonight!
Do I like it? I love it! That is such a brilliant idea and your tutorial was brilliant too. Great post!
Best wishes,
Natasha @ 5 Minutes Just for Me
GORGEOUS! I have been wanting one of these forever now! Thanks for the tips. I would love to have you share your talents at my VIP today =) http://designergarden.blogspot.com/2011/09/vip-party-26.html
Have a wonderful holiday weekend!! XO
I love it!!! And I especially love that you did it all by yourself. You bedroom looks like such a retreat. I’m sure you have many happy dreams in that room.
Thanks for sharing and have a great weekend.
XoXo,
Kristal
Very pretty and lots of work. You did a fabulous job:)
It turned out beautiful! Thanks for making this so simple. Other blogs make it sound very difficult to make, but I like your tutorial~
Love this!!! I am featuring it on my blog on Wednesday! http://www.johnnyinadress.com Have a wonderful Labor Day weekend!
Oh wow–great job! I am really impressed.
Very impressive! You did a wonderful job. I really like the headboard, too.
Could you leave it open and put a down comforter in it for the winter months? Do like a button hole opening or a velcro opening? Just a thought. Very cute!
This is gorgeous! You are one talented gal! I am SO following you now. 🙂
I would love to have you share this @ Show & Share–
http://southernlovely.blogspot.com/2011/09/show-share-4.html
You are so awesome that I just had to feature you this week at my Hookin Up with HoH par-tay!
Feel free to stop by and grab a button! You deserve it. 😀
xoxo
Allison @ House of Hepworths
Wow! I love this and I just bookmarked it so when I come back home I can take a better look. I can’t wait to browse your blog. Thanks for taking the time to share it with us. I’m your newest follower and subscriber.
Hugs…Tracy 🙂
I LUV it….like you, have wanted one too. BUT>>>>
any ideas of material list for a KING SIZE? Thank you. BEAUTIFUL JOB and great instructions.
Oh I love it!! I actually have the duvet from target…a lot less work, but yours is just too pretty! Great job. Visiting from Somewhat Simple!
theshabbytulip.blogspot.com
Oh my goodness I am so in love with your comforter! It’s gorgeous. Not to mention your bed frame and that lovely textured pillow. Did you make that too? You’re amazing.
shannonsews.blogspot.com
Fantastico!
I just love your anthro like comforter.. its gorgeous. And thanks so much for sharing the video for the knots. I dont know if I would ever have the patience to finish one of these but I would love to try.
Thanks for the tute! I’ve been in love with the anthro comforter forever, and then my heart sank when I saw the price tag. Considered the Target knock-off, but really I just couldn’t do it when I knew it would be a simple stitch to make. Whoulda thunk it was just a circle! Thanks, I probably would have made a big tangled mess of out of a bed sheet and gave up!
Thank you so much for sharing this tutorial! The video was very helpful! Found you through a link party and I’m a new follower!
I LOVE this! I am always looking for new bedroom ideas. I will have to make it when I feel ambitious! 🙂 This would be a great winter project.
Thanks!
Melissa
http://www.sweetcoconutlime.com
Found this on the Sundae Scoop at I Heart Naptime. Great tutorial and video. I’m obsessed with this quilt, too. 🙂 I love the styling in your room, too. The blanket over the end is so nice and I LOVE the large grapevine wreath on top of the window pane. Pinning. 🙂
Very pretty. I looks perfect for your space. Sometimes we just need to put time into a project for great results. Enjoy!
Oh my word – this is beautiful! I’ve been in love with those bedspreads too! Hmmm….may just have to give it a try. Great job!!
I love it and think its fabulous! tempted to try my own.. found you through tt&j link up!
xoxo janean
http://howikeepsane.blogspot.com/
Looks great! Thanks for sharing 🙂
GORGEOUS! I like the way the room is styled. The mustard-colored lace blanket that hangs at the end of the bed really pulls the entire thing together. Pretty amazing!
Wow, you did a lovely job on this! I don’t sew, but if I did I’d make this. Found you on tatertots and jello.
Patricia
Gorgeous!!
Lovely! I’m not super crafty when it comes to sewing so I finally bit the bullet and bought the one you have pictured from Target. I love it! New follower on fb and pinterest 🙂
Looks beautiful! I bought the duvet from Target and sewed my own vintage buttons on every tuck! (It came out great and it will be posting this month) I’m impressed with yours, you started from scratch and it looks fantastic! Great job!
Susan
This is amazing! I’ve drooled over the expensive version for months myself – I can’t wait to try this project for myself!
amazing tutorial iv been wondering how to make one like this xxx
This is awesome! I LOVE Anthro’s bedding and this looks super chic. Great job!!
That looks great!! Very pretty. =)
Oh how beautiful! I can’t wait to try this! How many squares for a twin duvet?
On second thought, I wonder if the squares would be a little big for a twin? Would anyone know the dimensions for slightly small squares (and how many)?
Thanks again for the tutorial!
Love this! So adorable….can’t wait to make it myself 🙂 Gonna have to figure out King sizing though! Can you tell me where you purchased the bedskirt?
HI Jen!
It’s actually just burlap fabric placed between the mattress and box spring! For a king size, you will do 49 squares! 🙂
xo, Mallory @ Classy Clutter
Its like you read my mind! You seem to know a lot about this, like you wrote the book in it or something. I think that you could do with some pics to drive the message home a bit, but other than that, this is wonderful blog. An excellent read. I will definitely be back.
Omix-Ada 12006.08 Windshield Frame
My wife and i ended up being very comfortable when Raymond managed to carry out his web research out of the ideas he received from your own blog. It is now and again perplexing just to always be offering methods that people have been selling. And now we understand we’ve got you to be grateful to for this. The main illustrations you’ve made, the straightforward website navigation, the friendships you will help foster – it is everything incredible, and it is helping our son in addition to us reason why the situation is satisfying, which is particularly pressing. Many thanks for everything!
Bogs Women’s Classic High Tuscany Rain Boot
Great job on the tutorial! I love the way the comforter pulled the whole room together. Very nicely done! Thanks for sharing.
Melissa
redflycreations.blogspot.com
I really like it! For a non-sewer like me, it looks a little complicated! But with your tutorial I think I could even pull it off. I love the white! Thank you for sharing, I saw this on TT&J.
Looks great!
Simply lovely! The bedroom is so pretty too!
I love the bedroom. It’s very beautiful.
Love this! I am making one for myself but am having a really hard time finding a plain white duvet to buy. It’s the duvet, not the duvet cover I want, right? I can find a million covers but not the actual duvet! HELP!
Now I get it! I must try it right now. So pretty! Thank you very much.
Yes, you need to try it! Best of luck! Thanks for stopping by!
I’m hanging to put my winter bedding on (I live in Australia) but autumn just isn’t really happening.
The nights are a bit cooler & so are the mornings, but the days are still in the mid 20’s (68 Fahrenheit) so it’s still too warm for the doona (duvet, we call them doonas) & I love my doona covers, plus I love the cooler weather. I know, most people love our climate & I do too, but fair’s fair !! I want my doona! – See more at: http://betweennapsontheporch.net/bedding-change-from-winter-to-spring/#comment-524719
Now, these pillows are great. My children will love the Animal Applique Bedroom pillows. Thanks for your creative team!!
Jill recently submitted http://bestdowncomforterpro.com
Might you be able to abandon it open and put a down sofa in it for the winter months? Do like a catch gap opening or a velcro opening? Only an idea. Extremely charming!
This was great, I’m so glad I found this tutorial, my wife has been looking for something like this and she’s not very internet savvy so I told her I knew I could find a guide to doing this online, the internet has everything! Thanks for going through the work to post this!
Absolutely beautiful and excellent tutorial! So glad your link-up was before mine over at 504 Main! Jenn
Now I get it! I must try it right now. Thank you very much.
Help me
Might you be able to abandon it open and put a down sofa in it for the winter months?
Sure!